Saturday, February 15, 2014

Happy Valentine's Day...You Make My Heart Sing!

So...today is Valentine's Day.  My husband used to work in the floral industry many years ago.  Valentine's Days were spent in the office.  Because of that, we have never really celebrated it.  However, he gave up that profession and has now moved on to bigger and better things, but we still don't celebrate Valentine's Day....until this year.  I woke up this morning to find a card, a necklace and earrings.  ?????  Don't get me wrong, I love them, but it was totally unexpected and left me totally hanging in the wind.  I did not get him anything.

Well...I got to work doing what I do best, and I came up with this cake.  Music is an integral part of our lives.  It's the reason we met, so I wanted to tie that in somewhere.

Presenting.....Happy Valentine's Day - You Make My Heart Sing!

Inside is a chocolate layer and a yellow layer with peanut butter frosting in between the layers.  These are covered with a basic buttercream.  The flowers are made out of marshmallow fondant I made and tinted myself.  The music notes and staff are black candy melts.  The red hearts are chocolate chips melted and tinted with red gel food coloring.  

It took me most of the evening, but it's done, and I'm pretty excited about how it turned out.  

Wednesday, February 12, 2014

Hot Chocolate cupcakes...take 1

Have you heard of the movie "A Series of Unfortunate Events" from a few years ago?  This could very easily describe my adventures in baking this morning.  I have been wanting to do a hot chocolate cupcake for some time, so I decided today was the day.  The powers that be in baking world had other plans.

I am still on the hunt for the perfect yellow cake recipe, so I decided to use a box mix and jack it up with butter and milk instead of vegetable oil and water.  That was fine.  They still taste box mix to me, but that's just me.

I tried to put together a chocolate mousse for the filling...and it broke.  I tried to fix it with more cream, and it broke again.  It did, however, taste really good.

Now came the marshmallow frosting.  I found an easy recipe with butter, marshmallow creme, powdered sugar and vanilla.  What could go wrong?  Yep, you guessed it....it did not set up.  I did not have the marshmallow creme, so I went to plan B and just melted marshmallows.  That was fine except I added too many.  Many scoops of powdered sugar later and adding some milk...I finally got something usable.  Again, tasted pretty good.

After all of these unfortunate events, I was feeling pretty defeated but I decided to soldier on and put this mess together.  I hollowed out the center of the cupcakes and dumped in my chocolate mousse mess.  Smeared some over the top of the cupcake.  I then topped that off with the soft marshmallow frosting.  I drizzled on some leftover chocolate sauce from my mousse attempt.  I frosted a few cupcakes, drizzled on the chocolate sauce and threw them in the refrigerator before they melted down over the cupcake.

Now, I am exhausted, but I take solace in the fact that they do not look terrible...and they don't taste terrible either.


Monday, February 10, 2014

Chocolate Biscotti

I have been asked to make assorted desserts for a spaghetti dinner.  I like to keep with the theme I'm given, so tiramisu and canolis came to mind.  How cliche right?  Then, I found some biscotti recipes.  All kinds of biscotti.  I had never made it before, so I decided to do some test runs before the big day.

I chose to start my testing with chocolate with chocolate chips.  No brainer, right?  I was craving chocolate anyway (like that's something new).  It did not let me down!  Great chocolate flavor.

The only issue I ran into was that I made my dough "loaves" too big.  I ended up having to cut the loaves in half length-wise and then slice them.  Minor problem...crisis averted.  

Bonus:  This makes a LOT of biscotti.  I had to bring something to an event at the school the day after I made this.  I still had a whole container of this biscotti left, so in to the school it went.  I worried that people would think it was stale brownies.  To my surprise and utter delight, I went back to find an empty bowl and a "That was some pretty awesome biscotti."  


  • Here we go with the recipe:

  • 6 tablespoons butter, softened
  • 1 cup granulated sugar
  • 2 eggs
  • 1/4 teaspoon vanilla extract
  • 2 cups all purpose flour
  • 1/2 cup cocoa 
  • 1 teaspoon baking soda
  • 1 teaspoon salt
  • 1 cup semi-sweet chocolate chips.  

  • You will need to mix your dry ingredients separately from your butter, sugar, etc.

  • **  Cream butter and sugar.  Add eggs one at a time.  Add in vanilla.  
  • **  In your separate bowl, combine flour, cocoa, baking soda and salt.  Now, add flour mixture to your creamed butter/sugar mixture slowly, making sure all dry ingredients are incorporated before adding more. 
  • **  Stir in chocolate chips.  
  • **  Shape dough into a 12 x 4 inch log and place on a well greased baking pan (or use parchment paper). 
  • **  Bake in a preheated 350 degree oven for 30 minutes.

  • **  Remove from oven and let rest for 5 minutes. Cut loaf into 3/4 inch slices and place back on baking sheet, cut side down. 
  • **  Bake again for 8 minutes.  Then, turn cookies over and bake for an additional 5 minutes.
  • **  Cool completely and store in an airtight container.

Friday, February 7, 2014

Chocolate Chip Banana Bread

My grandson loves bananas.  He also loves the Minions from Despicable Me, who subsequently....love bananas.  He and my granddaughter came to visit me this past weekend, so I needed to have bananas on hand.  He ate his fair share, but I was left with a few on my counter.  Today, I decided it was either time for them to jump into the trash or jump into my mixing bowl.

They chose wisely and jumped into my mixing bowl.  I'm not a huge banana flavor fan, but I have to say the results of this little adventure might change my mind.  I was shopping through my recipes and found this one, which includes chocolate chips.  How could I go wrong?


Here's the ingredient list:

1-1/2 cup granulate sugar
3/4 cup butter (room temperature)
2 eggs
1-1/2 tablespoons milk
3 ripened bananas
2 cups flour
1 tsp baking SODA
chocolate chips (to your desire)

Here are the instructions:

Preheat oven to 350 degrees Fahrenheit.

Cream the sugar and butter in a bowl (I always use my Kitchen-Aid, but any mixer will do).  Add eggs and mix until blended.  Add the bananas (I just broke them into small pieces...did not mash) and then add milk.  Mix until completely blended (1-2 minutes).  Add flour and baking soda, mix until incorporated.  Stir in chocolate chips.

Spray 2 loaf pans with non-stick spray (I used Baker's Joy) and divide batter between the 2 pans.

Bake for 45 minutes.  It will look done, but trust me.  Bake the whole 45 minutes.  Insert a knife into the middle.  It should come back clean.  Let cool on rack for 30-45 minutes and ENJOY!

I am always interested in hearing feedback on my posts.  If you bake this, please let me know how it turns out!  This is not my original recipe, but we all make small modifications to suit ourselves.


Tuesday, January 21, 2014

Butterfly cupcakes

BUTTERFLY CUPCAKES
When my daughter had her second child, I decided that instead of having the traditional girls-only baby shower, I would do a big family party.  As it turns out, she delivered the baby 3 weeks early, so it turned into a “meet the new baby” party.  We also did not want to leave our granddaughter out of the celebration, so we combined “meet Baby Chase” with “Maddie’s a big sister.” 
Since there would be several small children at the party, I decided against a cake.  Instead, I thought about making cupcakes, of course.  I made a chocolate box mix cake (since I had so much else to do to prepare) and then made a basic buttercream frosting.  I used Wilton green gel food coloring to tint the buttercream.  I then used Wilton Candy Melts in light cocoa to trace the outline of the butterflies.  Once these were set, I used more of the candy melts and tinted them with Wilton gel food coloring in pink and blue.  I filled in the outlines with the pink or blue and then tapped the counter to smooth out the tinted chocolate and get out any bubbles.  I then detailed the wings with more melted light cocoa.  The final step was to make the butterfly bodies by making a small line on wax paper with the light cocoa melt and adding the wings. 

Monday, January 13, 2014

Happy Birthday to me!


Yesterday was my birthday. My husband asked me what kind of cake I wanted, and I told him I would be making my own.  I wanted to practice my ombre frosting flower technique.  

I used my favorite chocolate cake recipe (click here for the recipe) and then filled it with a peanut butter mousse frosting (peanut butter, butter, Kool-Whip, milk and powdered sugar).  Oh my...almost forgot to fill the cake because the mousse was so good.  I put a crumb coat of this peanut butter mousse on the outside of the cake to keep it neat and tidy.

I should mention with the chocolate cake recipe that you NEED parchment paper in the bottom of your pans.  I ran out of parchment paper, so I decided that Bakers Joy would just have to do.  Nothing against Bakers Joy, it's a fine product, but this cake is so moist that it will stick like super glue to the pan if you don't have parchment paper.

Now comes the part about the flowers.  I was so transfixed with tinting the frosting that I did not realize I did not make enough.  I had to make the flowers smaller than I wanted and could not overlap them like I wanted.  Lesson learned.  Overall, I was pleased with the way it came out, gaps and all.  

I served it to my family last night after our celebratory dinner at Carraba's (if you have not been, you MUST go).  You could almost literally hear my 5-year-old granddaughter inhaling her slice.  Everyone else also loved the cake and gave me great compliments.

Saturday, January 4, 2014

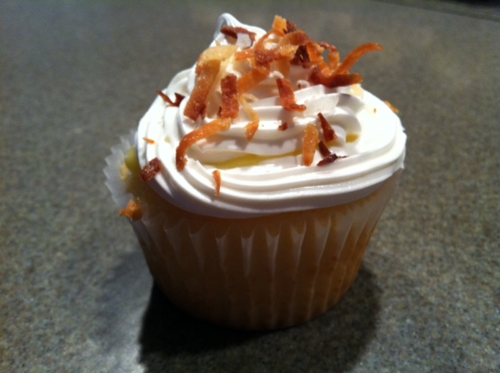
Coconut creme cupcakes

I like to take other desserts and turn them into cupcakes. I did it with bananas foster (which I will post later) and I just did it with coconut creme pie.

My husband loves his mother's coconut creme pie. I'm not going to try to compete with that. It's a no win for me...or for my husband.  Who do you tell that the other's was better?  All I will say about that is he LIVES with me.

Ok...back to the cupcakes.

image


Step 1:  line a baking sheet with parchment paper or Silpat. Spread a layer do coconut on the sheet and toast it up.  I did about 250 degrees Fahrenheit just until it turns brown and...we'll toasty.

Step 2:  Make the creme filling. I cheated when I made this and used instant vanilla pudding. I'm sure using the creme designed for the coconut creme pie would make it even better.  At any rate, I added a handful of untasted coconut to the pudding.

Step3:  Make your cupcakes. Again, I'm such a cheater. I was just experimenting so I used a regular vanilla box cake mix. I do boost my box cakes by adding an additional egg, substitute butter for the vegetable oil and substitute milk for the water. It makes a big difference in the taste.

Step 4:  Once your cupcakes are completely cool, dig out the center of each cupcake and fill with the pudding.

Step 5:  Add a buttercream frosting (any white buttercream will do). Then, sprinkle the toasted coconut on the top.

As hard as it is to believe...I do not like coconut. Do you remember the Whitman candy sampler? The one without the little guide?  Yep...nothing was a bigger disappointment in my young life than biting down on what I thought was a peanut butter filled candy and finding coconut.  Ugh!  Anyway, since I don't have any way of confirming that these are good personally, I had to enlist the help of my dear husband. He could not stop eating them. He didn't try to compare them to his mother's pie, but he obviously thought they were good. He gets to stay!