Friday, December 19, 2014

Peanut Butter Blossom....cupcakes


My son's class was having a Christmas party earlier in the week, and he volunteered me to make cupcakes.  Thanks!  I never mind baking, but I get nervous when it is for people I do not know.  Also, there is the transportation factor, especially when I am not the one doing the transporting.  

When I bake for those I am not familiar with, I like to eliminate all potential allergens as much as possible.  I made the base cupcakes using a recipe that does not call for milk, eggs, or butter.  I add about 1/2 cup of extra flour to this to make it a bit more sturdy since it will be a cupcake.  I literally just dump everything into the bowl and mix.  

2 C flour
2 C sugar
6 Tbsp cocoa
2 tsp baking soda
1 tsp salt
2 C warm water
2/3 C oil
2 Tbsp vinegar
2 tsp vanilla (or 1/2 tsp mint) extract

Put in cupcake liners and fill about 2/3 full.  Bake at 350 F for about 10-15 minutes (toothpick will come back clean).  

I made a batch of standard buttercream and decorated with royal icing to look like holly leaves and berries.  I still had some cupcakes left over, so I decided to make peanut butter frosting (no recipe....just 1/2 cup butter, PB to taste, milk and powdered sugar).  I dusted with sanding sugar to mimic the sugar on peanut butter blossom cookies and then topped with a Hershey kiss.  I saved 1-2 for me and packed the rest separately from the holly decorated cupcakes.

I sent my son off with these cupcakes to school.  When he got home that evening, I asked him how everyone like everything.  He fell to his knees and did the "we're not worthy" thing from Wayne's World.  I think it's fair to say everyone liked them!  Mission accomplished!

Friday, November 28, 2014

One more Frozen cake

You have to hand it to Disney.  They know how to hook the wee ones with their movies.  When my daughter was young, it was The Little Mermaid.  Now, my granddaughter is 6, and she is obsessed with the movie Frozen.  When I say she is obsessed, I mean it.  The girl is hardcore.  She is about as girlie as they come.  She loves to play dress-up and wear a tiara.  She recites the movie when she is playing with her dolls like she is re-enacting the movie.  Then comes the singing.....oh, the singing.  It's actually more like screaming...like those of you on the West Coast need to hear her singing in order for the world to stay on its axis.  There are arm motions and choreography to go along with the vocals.

So...my granddaughter turned 6 in mid November.  When I asked her what kind of cake she wanted, she looked at me with that tilted head and her hand on her hip and said "Oh Mimi, you know I want a Disney Frozen cake."  As if there might actually be other Frozen merchandise out there, she feels she needs to specify that it's Disney Frozen.

I asked my daughter to sit down with my granddaughter and decide what they wanted to see on the cake and they were more than happy to comply.  Of course Elsa was on the top, of course it was blue, of course there were sparkly bits.

I was actually pretty excited to make this cake because it gave me the opportunity to try some new techniques.  I did cheat and got the actual dolls to add to the cake as I was not going to take the time or the chance actually that I would not get the look right.  The 6 year-old would call me out in a heartbeat....just as she had when she turned 4 and I made cupcakes with frosting the color of all the Disney princess dresses and I happened to forget the green one, whomever she may be.  Ugh..the innocence of youth.

Anyway...this was the final product.  She loved it.  The other little girls at her party loved it.  I was once again a rock star in my granddaughter's world.....which is the absolute best place to be.


Tuesday, November 18, 2014

Mermaid cake and cupcakes

My son's high school marching band did a show about mermaids and how they are thought to have lured sailors to their deaths.  At the end of the marching season, one of the color guard moms asked me to bake some cupcakes for their end-of-season party.  I went to work making up the scene.

I decided to do a small cake to look like a rock with some mermaids sitting on it...and then make cupcakes to surround that rock.  I thought it would be cool to add some fondant in the shape of a shipwreck to put in some of the cupcakes.

I cheated and used box mix cakes.  Our local Walmart sells basic chocolate and vanilla for $1.00 per box.  I doctored up both batters so they wouldn't taste like box mixes.  I made both a vanilla and chocolate cake in a 9 x 13 pan, which I would later use to build my rock.  I then covered it with gray fondant.

I molded some teal fondant for the mermaids and used a piping tip to create the scales.  Then, I used a combination of pink, blue, purple and silver luster dust to paint over the mermaids to give them an iridescent sheen.

I baked my cupcakes and decorated them to look like waves.  I even piped white on some of the cupcakes to look like breakers in the water.  I molded brown fondant in my wooden board mold and then gave it dimension by painting over the brown with some black.

My friend, who ordered the cupcakes, stopped by my house the day I was working on them.  She had no idea what I had up my sleeve and she all but squealed with delight.  She couldn't wait to surprise the girls with their treat.  The next day, she came to pick up the cupcakes and promised to call me and let me know what the girls thought.

Sure enough, my phone rang like a half an hour later.  It was my friend's number.  When I answered, it was the entire color guard, 20 girls strong, saying thank you.  It just made my day.  It fills my heart with joy that I could give them a treat like this.

Here is the final product...


Thursday, October 23, 2014

Snickerdoodles

If you have been reading my blog, Thank You, and by now you know that my husband loves cinnamon.  I am constantly looking for different cinnamon recipes to try for him. He doesn't really have a sweet tooth, but occasionally, he will indulge in a sweet treat.

I found this recipe through ohsodelicioso.com.  It's a snickerdoodle cookie, but it's like a traditional snickerdoodle and a sugar cake had a baby.  This snickerdoodle is crispy to bite into, but it is soft on the inside.  I liked these so very much, and my husband....well, he could not get enough of them.

This dough needs to be refrigerated for at least an hour before baking the cookies.  When I started making this dough, I forgot about this detail.  I usually do my baking before I go to work around noon.  I was making this dough and then got to the "refrigerate dough for an hour" part, and I was heartbroken.  Then, I had to work for 8 hours thinking about these cookies.  I immediately started baking them when I got off work.  Trust me when I tell you they were worth the wait!


Ingredients
  • 1 C butter, at room temp
  • 1 1/2 C sugar
  • 2 large eggs
  • 2 3/4 C flour
  • 2 tsp cream of tartar
  • 1 tsp baking soda
  • 1/4 tsp salt
Instructions
  1. Cream butter and sugar together with electric mixer. Add eggs.
  2. In separate bowl sift flour, tartar, baking soda, and salt together. Slowly combine with butter mix.
  3. Chill dough in fridge for at least 15 minutes more if you can.
  4. Meanwhile grease cookie sheet and make a cinnamon-sugar mix by combining 3 T sugar and 3 tsp. cinnamon in a shallow bowl.
  5. When dough is chilled, take a small amount and roll into a ball about 1..5 -2 inches wide.
  6. Then roll ball in cinnamon-sugar mix to coat and place on cookie sheet.
  7. Bake for 8-10 minutes at 400 deg. Baking time varies depend upon size of dough balls so watch them close. Cool on rack.

Monday, October 20, 2014

Pumpkin cupcakes - dairy free

I had to do some baking for my son's percussion group today.  The group has a few members with dairy sensitivities.  I am constantly searching for dairy free recipes I can use for their treats.

Upon my search through recipes, I came across a paleo pumpkin cupcake recipe.  I decided I didn't have half the things I needed so I would just wing it.

Here is the original recipe:

  • 4 eggs
  • ⅓ cup coconut sugar
  • 2 tablespoons palm shortening
  • ½ cup canned pumpkin puree
  • ⅔ cup sweet potato flour
  • 1 teaspoon baking soda
  • 1 tablespoon pumpkin pie spice
  • ½ teaspoon salt
  • For frosting...
  • 1 cup palm shortening
  • ½ cup honey
  • 1 teaspoon vanilla extract
  • 1 tablespoon fresh lemon juice
Baking Instructions
  1. Preheat oven to 350 F and prepare a standard size cupcake/muffin pan with 8 cupcake liners or grease very well.
  2. By hand or with an electric mixer, cream together the eggs, coconut sugar, and shortening.
  3. Add the pumpkin puree and combine well.
  4. Add sweet potato flour, baking soda, pumpkin pie spice, and salt. Combine well.
  5. Divide batter evenly into eight cupcakes.
  6. Bake at 350 for 25 minutes, allow to cool completely.
  7. Prepare frosting while cupcakes are cooling. Whip together palm shortening, honey, vanilla, and lemon juice. Spread, drop or pipe a generous amount on each cupcake and serve!

Here is my revision:

**  4 eggs
**  1/3 cup granulated sugar
**  2 tablespoons coconut oil
**  1/2 cup pumpkin puree
**  2/3 cup all purpose flour
**  1 tsp baking soda
**  1 tablespoon pumpkin pie spice
**  dash salt

for the frosting
**  1 cup coconut oil
**  1/2 cup honey
**  1 tsp vanilla extract
**  1 tablespoon lemon juice
**  powdered sugar to taste and consistency

for the filling
**  brown sugar
**  coconut oil
**  pumpkin puree    (I mixed this all together on the stove for a few minutes).


I followed all baking instructions as listed above.  My batter made an even dozen cupcakes.

NOTE:  I do not eat pumpkin so I did not try them.  I had my husband try them and he said they were dry....and didn't taste like cupcakes.  I took them with me to my son's rehearsal and had the director try one.  She said it tasted more like a muffin than a cupcake but said it was good.  (I love her, she's my favorite).  I believe using butter would have made the consistency more like a cupcake.

Wednesday, October 15, 2014

Salted Caramel Chews

My husband is self employed.  He has several employees working for him.  For reasons unbeknownst to either of us, 2 of his long-time employees have left the company.  That means poor hubby has to pick up the slack and do the work of 3 people.  He has been working long days and nights, and he is often less than pleasant when he finally arrives home.

What does this have to do with cakes or baking you ask?  Well, I was just about to get to that part.  It doesn't really, but I found a recipe for caramel chews and wanted to try them.  I asked him sort of off the cuff if he liked them and he said yes.  Light bulb!  I can make these caramel chews to help cheer him up.  I mean, everyone drowns their sorrows in sugary goodness right?  Usually not my husband as he does not have a particularly sweet tooth.

Anyway, before I get myself off topic.  These caramel chews are pretty easy to make.

This picture was done in a hurry and absolutely does not do these things justice. I am not a big caramel fan, but I did sample one before I wrapped it.  The coarse salt makes something magical happen.


Here are the ingredients:

  • 1½ sticks butter
  • ½ cup sugar
  • 3 tablespoons light corn syrup
  • 14 oz sweetened condensed milk
  • 1/2 tsp vanilla (optional)
  • coarse sea salt

Here are the instructions:

  1. In a medium sauce add butter and sugar and stir over medium heat until melted. Stir in corn syrup and condensed milk.
  2. Bring to a boil and then decrease to simmer 7-10 minutes or until mixture achieves golden brown color, stirring constantly.
  3. Poor caramel into a foil-lined 8 x 8 inch pan and allow to cool completely. Sprinkle with coarse sea salt.
  4. When completely cooled, cut into squares and wrap in wax paper.

Tuesday, October 7, 2014

Pumpkin spice cookies

It's October, and that means the whole world is going pumpkin spice crazy.  Admittedly, I cannot say I am part of that craze as it's not one of my favorite flavors.  However, far be it from me to deprive my family of the flavor they love so much.

I decided to try this recipe this morning while both my husband and son were at work.  What a surprise they will get when they come home.  They will be singing the praises of Momma from the rooftop!  Hey, a girl can dream.

Here is the recipe from Cookies and Cups:

Ingredients
1 cup butter, room temperature
1 cup light brown sugar
1/2 cup granulated sugar
2 eggs plus 1 yolk
2 tsp vanilla
3 tsp Pumpkin Pie Spice
1 tsp baking powder
3/4 tsp salt
3 cups flour
1/4 cup light brown sugar
1 1/2 tsp Pumpkin Pie Spice

How to Make
1. Preheat oven to 375°
2. In bowl of stand mixer cream butter and both sugars together for 2 minutes until light and fluffy.
3. Add in both egg and additional yolk into butter along with vanilla and beat until smooth, scraping the
sides as necessary.
4. Mix in Pumpkin Pie Spice, baking powder and salt until combined.
5. Reduce speed on mixer to low and mix in flour until dough comes together.
6. Chill dough for at least an hour.
7. When ready to bake, line baking sheet with parchment paper and preheat oven to 375°
8. Mix coating ingredients (light brown sugar and pumpkin pie spice) together in a bowl, set aside.
9. Roll dough into large balls, about 1 1/2 inches in diameter and then roll into the sugar/pumpkin pie
spice mixture, coating completely.
10. Bake for 7-8 minutes until cookies are lightly browned on the bottom. Remove from oven and
transfer to wire rack to cool.

I did not follow this recipe to the letter, but I think the results will be the same...and here are my results:

Friday, September 19, 2014

Sugar Cookies

No matter if you call them sugar cookies or sugar cakes, the fact remains that they are delicious.  I have a few recipes for these cookies, but I am always willing to try more.  My personal preference is more of a soft pillowy cookie....unless I am going to frost the top.  Then, I make a recipe with a crispier cookie.

This is a new recipe for me, and it seems to blend the two ideas together.  It is soft and crispy at the same time.

The recipe I found was named Amish Sugar Cookies.  I'm not sure what makes them Amish, but that's really not the point.  These cookies are good.

The recipe does not call for milk, but have a glass on hand when the cookies come out. It's the perfect compliment to a warm cookie!


Ingredients:

1 cup butter 
1 cup vegetable oil (I used olive oil)
1 cup sugar
1 cup powdered sugar
2 eggs
1 tsp vanilla extract (I would add a bit more for a bolder tasting cookie)
4-1/2 cups flour
1 tsp baking soda
1 tsp cream of tartar

Directions

  1. In large bowl, beat the butter, oil and sugars. Beat in eggs until well blended. Beat in vanilla. Combine the flour, baking soda and cream of tartar; gradually add to creamed mixture.
  2. Drop by small teaspoonfuls onto ungreased baking sheets. Bake at 375° for 8-10 minutes or until lightly browned. Remove to wire racks to cool. Yield: about 5 dozen.


Sunday, August 24, 2014

Banana bread counts as fruit...right?

Every week when I go to the market, I have the best intentions.  "I am going to buy lots of fruit and vegetable so the family can eat healthy."  Yeah...about that.  Every week I have an over ripened bunch of bananas to do something with.  This week, banana bread came up in the rotation.  You know, now that I think about it....I think there may be a conspiracy.  If we don't eat the bananas, she'll make something sweet with the.  Hmmmmm..I believe I'm being had here.  They are luck they're cute.

Anyway, I had soooo many bananas yesterday, I had enough to do 2 loaves of banana bread.  I baked these up while the troops were away, so I was able to freeze one loaf for later in the week. Are any of you as excited as I am for school to start again?  If for nothing else, to ease up on my food bill.

Wow...I'm a little scattered today.  Sorry about that.  I found this recipe on line quite some time ago. It is enough to make 1 loaf of the bread. I doubled the recipe and it turned out just fine.  It is really tasty.  It's moist with lots of banana flavor, but not too sweet.  I would imagine you could give it a quick toast and put butter on it.  Yummmmm ...

Preheat oven to 350 F

2 cups all purpose flour
1 teaspoon baking SODA
1/4 teaspoon salt
1/2 cup butter
3/4 cup brown sugar
2 eggs, beaten
2-1/3 cups mashed bananas

Lightly grease loaf pan (I line with parchment)

In a large bowl, combine flour, baking soda and salt.  In a separate bowl, cream together the butter and the brown sugar.  Add eggs and bananas until well blended.  Add banana mixture to the flour bowl and mix until just moistened.  Pour batter into prepared loaf pan.


Bake for 60-65 minutes.  When done, a toothpick inserted in the center will come back clean.  Allow to cool in the pan for 10 minutes before removing.  Then, place on a cooling rack until completely cool. ..if you can wait that long.


Wednesday, July 30, 2014

Easy recipe, no milk, no flour...peanut butter and chocolate chip cookies

By now you know how much of an absolute peanut butter enthusiast I am.  I cannot, for the life of me, understand how people do not like peanut butter.  Just the mere thought of it makes my mouth water.

I stumbled upon this recipe for peanut butter chocolate chip cookies.  It could not have been more simple.  There are only 5 ingredients!  There is also no milk and no flour!  I made these for my son's percussion group where there are some kids with lactose allergies and gluten allergies.  They almost created a black hole inhaling these cookies!

1 cup creamy peanut butter
1 egg
1 tsp baking SODA
1 cup brown sugar....packed firmly (use light brown sugar)
1/2 cup chocolate chips

That's it!  Throw it all in a bowl and mix!  Scoop by tablespoon onto a lined cookie tray.  Oven should be 350 degrees Fahrenheit.  Bake these for 7-9 minutes.  Allow cookies to cool completely before removing from tray.

These cookies are sooooo good.  They are gluten free and lactose free....so they are healthy right?  That's the rationale I use anyway.

Happy baking!

Wednesday, July 23, 2014

Almond cookie recipe

I am always looking for a new cookie recipe to try.  Even the best chocolate chip recipe gets tired after a while.

We had a few friends over to our house this past weekend.  I was trying to find some recipes that would allow me to prepare the food early in the week and then freeze the food until the weekend.  I found an easy recipe for almond cookies.  They are much like butter cookies or shortbread cookies.  I personally do not eat almond, so I could not test these for myself.  I was hostage to the opinions of others.

Here's the recipe:

  • 1 cup butter
  • 3/4 cup sugar
  • 1 teaspoon almond extract
  • 2 cups flour
  • 1/2 teaspoon baking powder
  • 1/4 teaspoon salt

  • In a bowl blend the butter, sugar, and almond extract. In a separate bowl mix the flour, baking powder, and salt. Add the flour mixture 2 Tablespoons at a time to the butter mixture until completely combined.

    Roll into small balls and flatten slightly. Cook for 7 minutes (they will not look done) at 400 degrees on a lightly greased pan or parchment lined pan. Cool cookies until they are just warm and place sliced almonds on top of each cookie.  (I only ha slivered almonds, but these worked just was well.)  

    Now, it's time for the almond glaze....
  • 1/2 cup powdered sugar
  • 1 teaspoon almond extract
  • 3 teaspoons water

  • For the glaze: Combine powdered sugar, almond extract, and water. Drizzle a spoonful of glaze on top of the almonds and cookie.


    Well, the cookies baked up beautifully, they froze beautifully and then defrosted beautifully.  I couldn't quite understand my guests as they tried to talk with cookie crumbs in their mouths, but I heard a lot of "Mmmmmm" and saw lots of head bobbing, so I am going to assume they were good.  

    Tuesday, July 1, 2014

    Bridal Shower Cupcakes

    When my daughter was in high school, she had this little group of girls she would hang around with.  There were 2 of them that were especially close to her.  Now that they are in their mid 20's, they are still very close.  The third amigo is getting married at the end of summer, and the other two were throwing her a bridal shower.  The colors for the wedding are yellow and blue.  Her wedding dress is almost all lace, so I wanted to reflect that in the cupcake theme.

    I made both chocolate and vanilla cupcakes, put pale yellow buttercream frosting on them all and then decorated them with a blue flower and some pearl dragees.  The girls had given me an idea for a bridal dress on the top of the cupcake tower, so I made a cake using a Pyrex bowl.  I then covered that with white fondant and pressed my lace mold over the bottom of the dress to mimic the lace in the actual gown.

    I heard rave reviews from the bride-to-be, as well as the two girls throwing the party.  I don't think I have ever been more nervous or more proud of something I've created.

    Here is the final product...

    Friday, June 20, 2014

    Cupcake bouquet

    I have a friend going through chemo for breast cancer.  Several of our friends have prepared meals that are oven ready and easy to serve.  Several have dropped by with flowers and well wishes.  I decided to do a bit of both...I made a cupcake bouquet.

    I wanted to mindful of the fact she was having chemo and may not be feeling well.  I decided to go with a chocolate cake with no milk or eggs.

    Here's the recipe:  http://tastycheapskate.blogspot.com/2011/01/wacky-cake.html

    I added some buttercream piped like flowers to complete the cupcakes.

    To build the bouquet, find a vase or basket of your choice.  Get some plastic cups and some clear Scotch tape.  I'm sure there is some scientific method to putting the cups together, but I just taped them together at the bottom of the cup and then fit them into the basket.  Once you have that completed, cut tissue paper into squares.  Put a square of tissue paper into each cup and then put a cupcake in the cup.  Once you have all your cups filled with paper and cupcakes, fill in any blank spots with additional tissue paper squares.

    Voila!

    I had my husband deliver the bouquet to my friend's house.  I got a note from her immediately following thanking me.  Knowing that I lifted her spirits just for a minute was gratitude enough for me.


    Tuesday, May 13, 2014

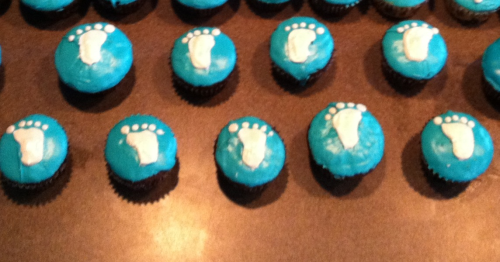
    Pitter patter of little feet

    My daughter asked me to bake cupcakes for her boss’ baby shower.  I asked my daughter what kind of cupcakes she wanted, but there was no real answer other than “she’s having a boy, she likes teal and she’t not a girlie girl.”  So….this is what I came up with.

I made chocolate cupcakes and vanilla cupcakes.  When they cooled, I colored the buttercream frosting and then put it in the microwave for about 15-20 seconds.  This made is somewhat of a glaze consistency.  I dipped the cupcakes in the frosting and then put them in the refrigerator to harden a bit.

I got a packet of stencils at the store a while back, and I found some baby stuff on one of the stencils.  I could not get the other things to come out in a manner that would be recognizable; so after much trial and error, I decided to make “pitter patter of little feet” cupcakes.  I took white buttercream, put it in the microwave for about 15 seconds and then poured it into a squeeze bottle (you could also use a piping bag and a small round tip).  I held the stencil over the cupcake and then filled it in with the white buttercream (think Royal Icing on cookies). 

I thought they were just about as cute as the day is long…I hope they went over well at the shower.
    My daughter asked me to bake cupcakes for her boss’ baby shower.  I asked my daughter what kind of cupcakes she wanted, but there was no real answer other than “she’s having a boy, she likes teal and she’t not a girlie girl.”  So….this is what I came up with.
    I made chocolate cupcakes and vanilla cupcakes.  When they cooled, I colored the buttercream frosting and then put it in the microwave for about 15-20 seconds.  This made is somewhat of a glaze consistency.  I dipped the cupcakes in the frosting and then put them in the refrigerator to harden a bit.
    I got a packet of stencils at the store a while back, and I found some baby stuff on one of the stencils.  I could not get the other things to come out in a manner that would be recognizable; so after much trial and error, I decided to make “pitter patter of little feet” cupcakes.  I took white buttercream, put it in the microwave for about 15 seconds and then poured it into a squeeze bottle (you could also use a piping bag and a small round tip).  I held the stencil over the cupcake and then filled it in with the white buttercream (think Royal Icing on cookies). 
    I thought they were just about as cute as the day is long…I hope they went over well at the shower.

    Thursday, April 17, 2014

    Easy Recipe Pecan Pie minis

    I was explaining to someone the other day how I love to bake.  He asked me if I would be willing to bake a pecan pie for his significant other's birthday.  He wanted the kind with the whole pecans, and nobody had them around our area.  I told him I had not made one before, but I would be willing to find a recipe and try.  I told him to come by the house and I would give him a sample.

    One problem with that theory...I don't eat pecan pie.  I asked my guinea pig husband if he liked pecan pie and he said NO in no uncertain terms.  Hmm..what to do?  Who is going to tell me if the pie tastes good?

    I decided instead of making a full-sized pie, I would make little individual sized pies so I could shop for more opinions.

    I found a recipe from Paula Deen for the pie...
    1 cup sugar 
    3 tablespoons butter, melted 
    1/2 cup dark corn syrup 
    3 large eggs, beaten 
    1 1/2 to 2 cups pecan halves 
    2 tablespoons good-quality bourbon (I left this part out in my pie)
    1 (9-inch) deep-dish pie shell, unbaked

    In a medium bowl, stir together the sugar and melted butter. Add the corn syrup, eggs, pecans, and bourbon, and stir until all ingredients are combined. Pour mixture into an unbaked pie shell, and place on a heavy-duty cookie sheet. Bake for 10 minutes. Lower the oven temperature to 350 degrees F, and continue to bake for an additional 25 minutes, or until pie is set. Remove from oven and cool on a wire rack


    I thought they looked pretty good.  I still had the problem of who would try them.  I turned to Facebook armed with this picture and these words..."I have 6 more of these left.  First one to comment gets them."  Problem solved!  I had a willing participant within 5 minutes.  Luckily, she gave me a glowing review!  

    The real pie will be due at the end of the month.  I hope his family enjoys the pie.  

    Thursday, April 10, 2014

    Minion cake

    My grandson recently turned 2 years old, and the term "all boy" could not be more true with him.  My daughter is having a bit of a hard time with this concept because her first child, a girl, is the true definition of princess...not to mention that my daughter was a princess herself when she was little.

    My grandson loves trucks, trains and playing in the mud.  What he loves most of all though...are minions.  If you are not familiar with minions, look them up on Google or YouTube.  They are the little yellow guys in the Despicable Me movies.  

    The week before I was to have this cake completed, I decided I was not going to procrastinate like usual.  I made a list of things I needed for each layer.  I made a task list for each day during the week.  I was so excited.  I was not going to have to be up until all hours of the night!  About that....nothing got done until the night before the cake was due.  Nothing....well except 1 batch of fondant.  I was up until 3:30 a.m. the night before and then back up at 7:00 a.m.  I had to cut details that I wanted to add.  

    All in all, I think my little minion cake looks pretty good.  I wanted purple cotton candy for the purple guy's hair but could not find it.  The purple guy's arms were supposed to be the other direction and holding the candle and sign, but the fell.  I forgot to take the yellow guy's hair with me to the party.  My silver dust filled in all of the stone texture I put into the bottom layer so it just looked poorly covered; but hey, my grandson was happy...and that's just fine with me.


    Tuesday, April 8, 2014

    Snickerdoodle cake with cream cheese frosting

    It was my dear husband's birthday last week.  In my house, when it's your birthday, you get to choose the flavor and the design of the cake.  I knew he would never, ever ask for anything...it's just the way he is.  I happen to know that his very favorites are cream cheese and cinnamon.  Armed with this knowledge, I went to work finding an easy cake recipe that would combine the two.

    Along came the snickerdoodle cake with cream cheese frosting.  I knew he would love it.

    From http://caribbeanmissionarywife.blogspot.com/

    preheat oven to 325 deg fahrenheit and butter and flour 2 round pans
      (I use 9 inch but 8 inch would be just dandy)

     Whisk together
    3 cups all-purpose flour
    1 Tablespoon baking powder
    1/2 teaspoon salt
    1 Tablespoon ground cinnamon


     In a separate bowl cream together  till they are nice and fluffy
    2 sticks (softened) butter
    1 3/4 cups fine sugar
    1 cup sour cream


    Add  to cream mixture one-at-a-time
    4 large eggs at room temperature
    1 Tablespoon Vanilla
    1 1/4 cups whole milk (room temperature) 


    Don't let this confuse you, 
     add 1/3 cup of flour mixture to cream mixture....a little milk and stir....
    1/3 cup of flour mixture.....a little milk and stir.....
    etc, until all the flour and milk are added

    Bake until a toothpick comes clean.  Mine took a little under 30 minutes.
    Cool before slicing again and frosting.


    For the frosting, I used this recipe loosely and added cream cheese and cinnamon:
    1/3 cup butter
    4 1/2 cups powdered sugar
    1/4 cup milk
    1 1/2 teaspoon vanilla
    cream cheese (I used 8 oz due to my husband's love of the stuff)
    cinnamon (I used enough to sort of thinly coat the top of the bowl  - again due to my husband's love of cinnamon)

    He loved the cake.  He made that OMG face and everything.  I think he had a happy birthday.  Mission accomplished.

    Oreo crumble crispies


    Did you ever get an uncontrollable craving for something sweet?  Well, I had one the other day.  I was looking through Pinterest and it hit me....MUST HAVE SWEETS.  I found this recipe for Oreo crispies and thought it would be perfect.

    What you need:
    1 can crescent rolls (8 triangles total)
    1/4 cup cold butter
    1/4 cup brown sugar
    2 tbsp granulated sugar
    6 Double Stuff Oreos
    1/2 cup flour

    glaze:
    1/2 cup powdered sugar
    1 tbsp softened butter
    1 tsp vanilla
    1 tbsp milk

    Here we go:
    1 - preheat oven to 400 degrees Fahrenheit.
    2 - prepare cookie sheet with parchment paper or Silpat - do NOT grease
    3 - crumble Oreos by food processor or by placing them in a bag and crushing with a rolling pin
    4 - combine Oreo crumbs, brown sugar, white sugar and flour
    5 - cut the cold butter into the Oreo mixture to form a crumble
    6 - separate the crescent roll dough on your prepared cookie sheet - I pressed them down a little for more surface area :)
    7 - Add the Oreo crumble to the crescent triangles
    8 - Bake for 8-12 minutes at 400F
    9 - Let cool completely and then cut into smaller pieces if you wish.
    10 - make the glaze by combining all ingredients together and then drizzle over the Oreo crumble crescents.


    I have tried to detail the steps to be thorough.  Please don't be put off by the number of steps.  This is super easy and equally as quick to put together....and very well worth it.

    I am now thinking about different cookie combinations to use.  Nothing personal Oreo, I'm just always looking for something new and exciting.  Maybe peanut butter cookies with a chocolate glaze?

    Saturday, March 22, 2014

    Ruffle cake

    So...this is my first attempt at a ruffle cake.

    I guess it could be worse.  It is, however, like a Monet painting.  From far away, really pretty.  When you get closer, you can see aallllllllll of the imperfections.  

    I have been baking away this week.  My son's high school is hosting an indoor guard/percussion competition, and we are having a bake sale.  So on top of that, because I am a little crazy, dumb, overzealous, I decided I would make this cake for the judges room.  

    It seems that karma/reality has a way of knocking you down a few pegs occasionally.  I was feeling so prepared for this cake to just zip together perfectly.  I was organized, I was prepared, I had allowed myself ample time and then BAM!  Karma, Murphy's Law, whatever you want to call it.  My chocolate cake is super moist and it did not like being stacked and crumb coated for some reason.  It kept trying to behave like an earthquake cake.

    I went with my go-to chocolate and vanilla cake recipes.  I used a basic buttercream to crumb coat.  Earlier in the week, I made the marshmallow fondant and then the flowers.  Finally finished fighting with the cake at about 2:30 a.m. and here is the final product.

    Saturday, February 15, 2014

    Happy Valentine's Day...You Make My Heart Sing!

    So...today is Valentine's Day.  My husband used to work in the floral industry many years ago.  Valentine's Days were spent in the office.  Because of that, we have never really celebrated it.  However, he gave up that profession and has now moved on to bigger and better things, but we still don't celebrate Valentine's Day....until this year.  I woke up this morning to find a card, a necklace and earrings.  ?????  Don't get me wrong, I love them, but it was totally unexpected and left me totally hanging in the wind.  I did not get him anything.

    Well...I got to work doing what I do best, and I came up with this cake.  Music is an integral part of our lives.  It's the reason we met, so I wanted to tie that in somewhere.

    Presenting.....Happy Valentine's Day - You Make My Heart Sing!

    Inside is a chocolate layer and a yellow layer with peanut butter frosting in between the layers.  These are covered with a basic buttercream.  The flowers are made out of marshmallow fondant I made and tinted myself.  The music notes and staff are black candy melts.  The red hearts are chocolate chips melted and tinted with red gel food coloring.  

    It took me most of the evening, but it's done, and I'm pretty excited about how it turned out.  

    Wednesday, February 12, 2014

    Hot Chocolate cupcakes...take 1

    Have you heard of the movie "A Series of Unfortunate Events" from a few years ago?  This could very easily describe my adventures in baking this morning.  I have been wanting to do a hot chocolate cupcake for some time, so I decided today was the day.  The powers that be in baking world had other plans.

    I am still on the hunt for the perfect yellow cake recipe, so I decided to use a box mix and jack it up with butter and milk instead of vegetable oil and water.  That was fine.  They still taste box mix to me, but that's just me.

    I tried to put together a chocolate mousse for the filling...and it broke.  I tried to fix it with more cream, and it broke again.  It did, however, taste really good.

    Now came the marshmallow frosting.  I found an easy recipe with butter, marshmallow creme, powdered sugar and vanilla.  What could go wrong?  Yep, you guessed it....it did not set up.  I did not have the marshmallow creme, so I went to plan B and just melted marshmallows.  That was fine except I added too many.  Many scoops of powdered sugar later and adding some milk...I finally got something usable.  Again, tasted pretty good.

    After all of these unfortunate events, I was feeling pretty defeated but I decided to soldier on and put this mess together.  I hollowed out the center of the cupcakes and dumped in my chocolate mousse mess.  Smeared some over the top of the cupcake.  I then topped that off with the soft marshmallow frosting.  I drizzled on some leftover chocolate sauce from my mousse attempt.  I frosted a few cupcakes, drizzled on the chocolate sauce and threw them in the refrigerator before they melted down over the cupcake.

    Now, I am exhausted, but I take solace in the fact that they do not look terrible...and they don't taste terrible either.


    Monday, February 10, 2014

    Chocolate Biscotti

    I have been asked to make assorted desserts for a spaghetti dinner.  I like to keep with the theme I'm given, so tiramisu and canolis came to mind.  How cliche right?  Then, I found some biscotti recipes.  All kinds of biscotti.  I had never made it before, so I decided to do some test runs before the big day.

    I chose to start my testing with chocolate with chocolate chips.  No brainer, right?  I was craving chocolate anyway (like that's something new).  It did not let me down!  Great chocolate flavor.

    The only issue I ran into was that I made my dough "loaves" too big.  I ended up having to cut the loaves in half length-wise and then slice them.  Minor problem...crisis averted.  

    Bonus:  This makes a LOT of biscotti.  I had to bring something to an event at the school the day after I made this.  I still had a whole container of this biscotti left, so in to the school it went.  I worried that people would think it was stale brownies.  To my surprise and utter delight, I went back to find an empty bowl and a "That was some pretty awesome biscotti."  


    • Here we go with the recipe:

    • 6 tablespoons butter, softened
    • 1 cup granulated sugar
    • 2 eggs
    • 1/4 teaspoon vanilla extract
    • 2 cups all purpose flour
    • 1/2 cup cocoa 
    • 1 teaspoon baking soda
    • 1 teaspoon salt
    • 1 cup semi-sweet chocolate chips.  

    • You will need to mix your dry ingredients separately from your butter, sugar, etc.

    • **  Cream butter and sugar.  Add eggs one at a time.  Add in vanilla.  
    • **  In your separate bowl, combine flour, cocoa, baking soda and salt.  Now, add flour mixture to your creamed butter/sugar mixture slowly, making sure all dry ingredients are incorporated before adding more. 
    • **  Stir in chocolate chips.  
    • **  Shape dough into a 12 x 4 inch log and place on a well greased baking pan (or use parchment paper). 
    • **  Bake in a preheated 350 degree oven for 30 minutes.

    • **  Remove from oven and let rest for 5 minutes. Cut loaf into 3/4 inch slices and place back on baking sheet, cut side down. 
    • **  Bake again for 8 minutes.  Then, turn cookies over and bake for an additional 5 minutes.
    • **  Cool completely and store in an airtight container.